Garment Studio 1.9.1 · Beta · Blender 5.2 · Windows with an NVIDIA graphics card

Garment Studio Guide

Make clothes in Blender the way you would in Marvelous Designer: draw flat pattern pieces, sew their edges, place them on an avatar and let the cloth drape. Every clip and picture here was recorded in Blender with this version.

Get it: Gumroad · Superhive · Watch: a cloth made from scratch

Get started

From an empty file to a draped T-shirt

Four steps, the same ones the Get Started panel shows at the top of the Garment tab while a file has no avatar or no pieces.

You need

Blender 5.2 on Windows, with an NVIDIA graphics card. The physics engine comes inside the add-on; nothing else to install.

Install

Edit › Preferences › Get Extensions, the ⌄ menu at the top right, Install from Disk, and pick garment_studio-1.9.1.zip.

Open Garment Studio, recorded in Blender

Step 1

Open Garment Studio

  1. In any 3D view press N: the sidebar's Garment tab has Open Garment Studio.
  2. It makes the Garment workspace: the 3D window on the left, the pattern window on the right, each with its Tools at the left and its panels in the sidebar.
  3. Deleted it? The same button makes it again.
An avatar to dress, recorded in Blender

Step 2

An avatar to dress

  1. Get Started, step 1: pick your own character in Your Own, or Add the Test Mannequin.
  2. The Avatar panel, in both sidebars, sets how the avatar looks (Solid, See-Through, Hidden) and its height.
Pattern pieces, recorded in Blender

Step 3

Pattern pieces

  1. Step 2: Add a T-Shirt, or More Garments for the others. Or draw your own piece with Rectangle in the Tools.
  2. The pieces lie flat in the pattern window and start wrapped round the avatar in 3D.
Simulate, recorded in Blender

Step 4

Simulate

  1. Step 3: Simulate, Space, or the play button in the 3D window's tool settings row.
  2. The pieces sew shut and drape. Space again pauses; Reset puts the cloth back where it started.

The windows

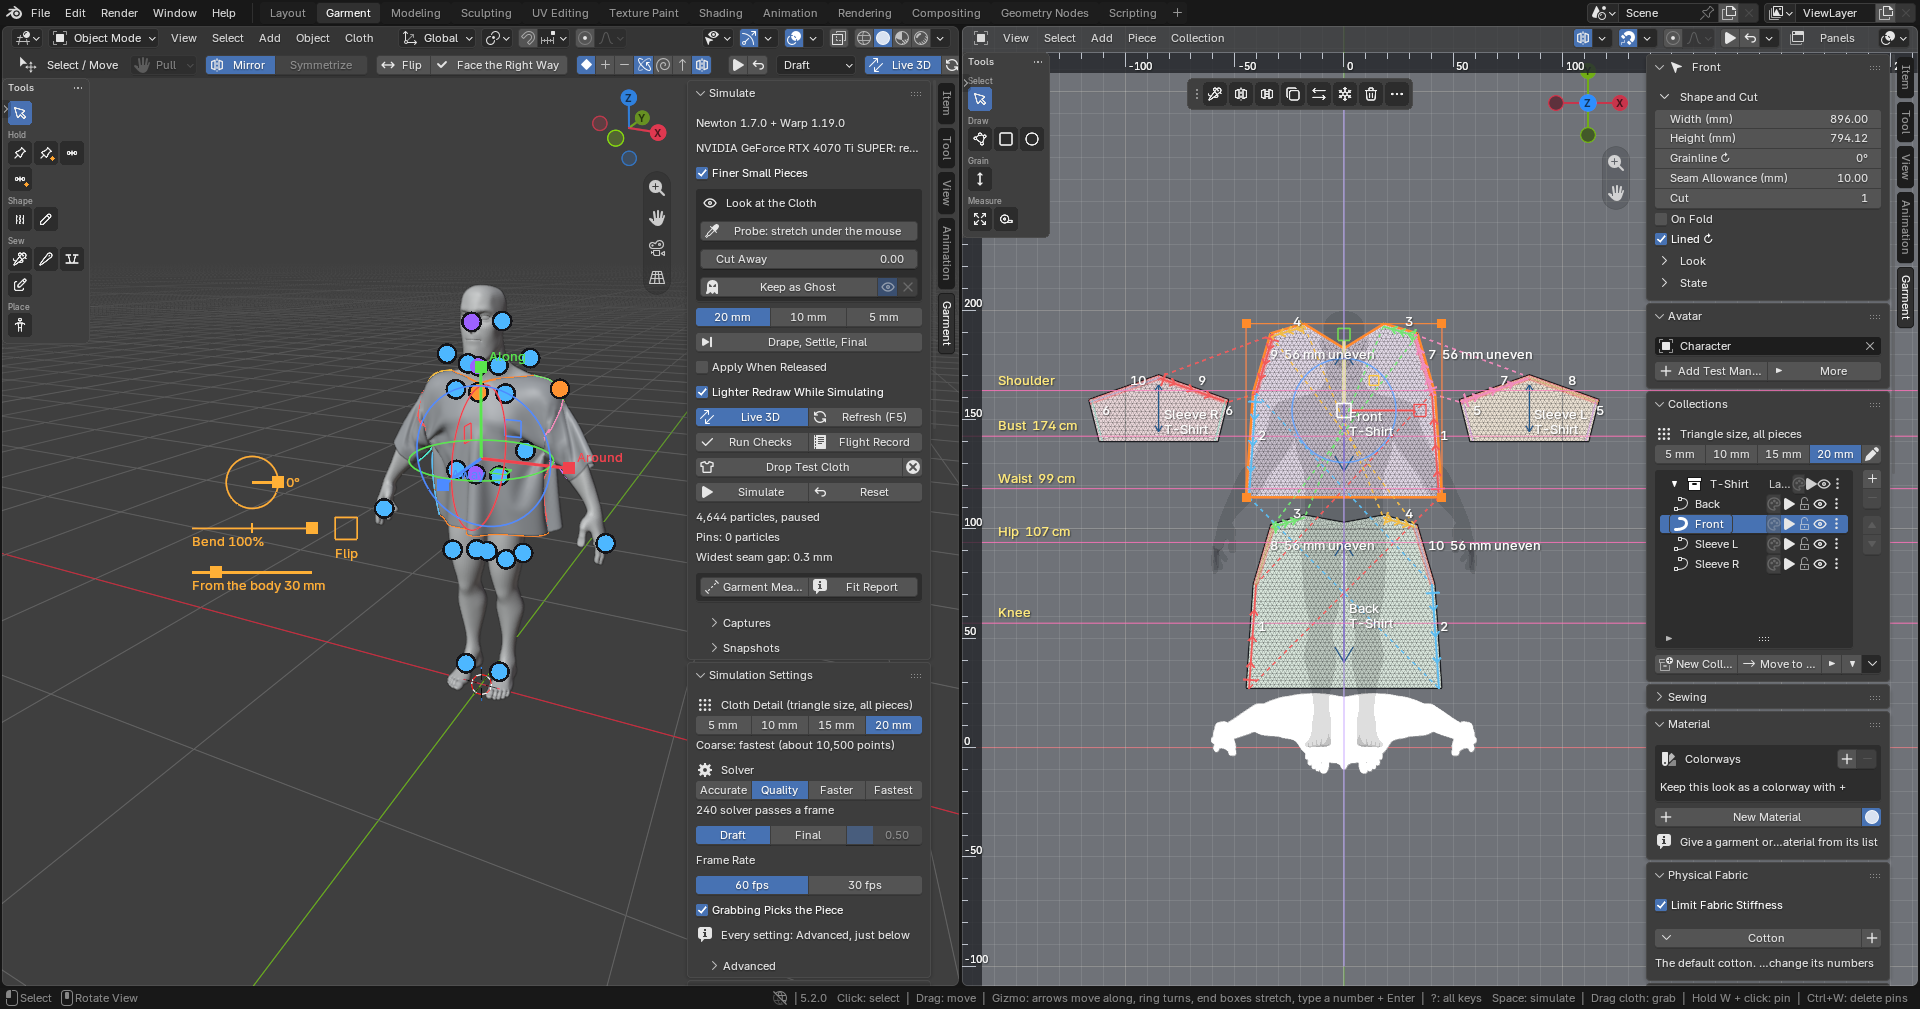
Two windows, one garment

The 3D window on the left holds the avatar and the cloth; the pattern window on the right holds the flat pieces at real size. Each has the same parts, where Blender keeps its own.

The Garment workspace with the Front picked: Tools at the left of each window, the Garment tab's panels at the right, the task bar over the pattern and the piece's values in the tool settings row
The Front picked: its values in Picked and in the tool settings row, its buttons in the task bar, its gizmo in 3D.

Tools T

At the left of each window, square icons under group names. Rest the mouse on one for its name; Shift+Space then a letter picks one. The 3D window has a Sew group too: sew on the cloth as on the pattern.

Sidebar N

The Garment tab holds the window's panels: Picked, Collections, Simulate, Physical Fabric, Triangle Size, Simulation Settings, Sewing, Check, Avatar and more. Shift+N chooses which show; Alt+N opens it on the Garment tab. Nothing opens it for you.

Task bar

Over the pattern, top centre: the buttons for what is picked. Drag its grip to move it; right-click to hide it.

Tool settings row

The tool's options, and at the right the pick's values: a piece's width, height and seam allowance, an edge's length, a seam's two sides with Even Out, Flip and Lock.

Modes and menus

Four modes, from the drop-down at the left of the pattern window's header or the Ctrl+Tab pie: Object Mode (whole pieces), Edit Mode (points, edges, lines), Sew Mode (seams) and Trims Mode (buttons, zips, cords); Tab switches Object and Edit. View, Select and Add are always there; Object Mode adds Piece and Collection, Edit Mode Point, Edge, Line and Finish, Sew Mode Sew, Trims Mode Trims. In 3D, Cloth comes after Object.

Right-click and hints

Right-click a piece, edge, point, seam or the cloth for what you can do to it. The status bar shows the keys of the tool in hand; F1 draws every key on a keyboard.

Your own layout

Garment Studio in any workspace

It works like any Blender add-on: outside its windows Blender stays as it was, and you can lay out your own.

Any 3D view as a pattern window, recorded in Blender

Clip 1

Any 3D view as a pattern window

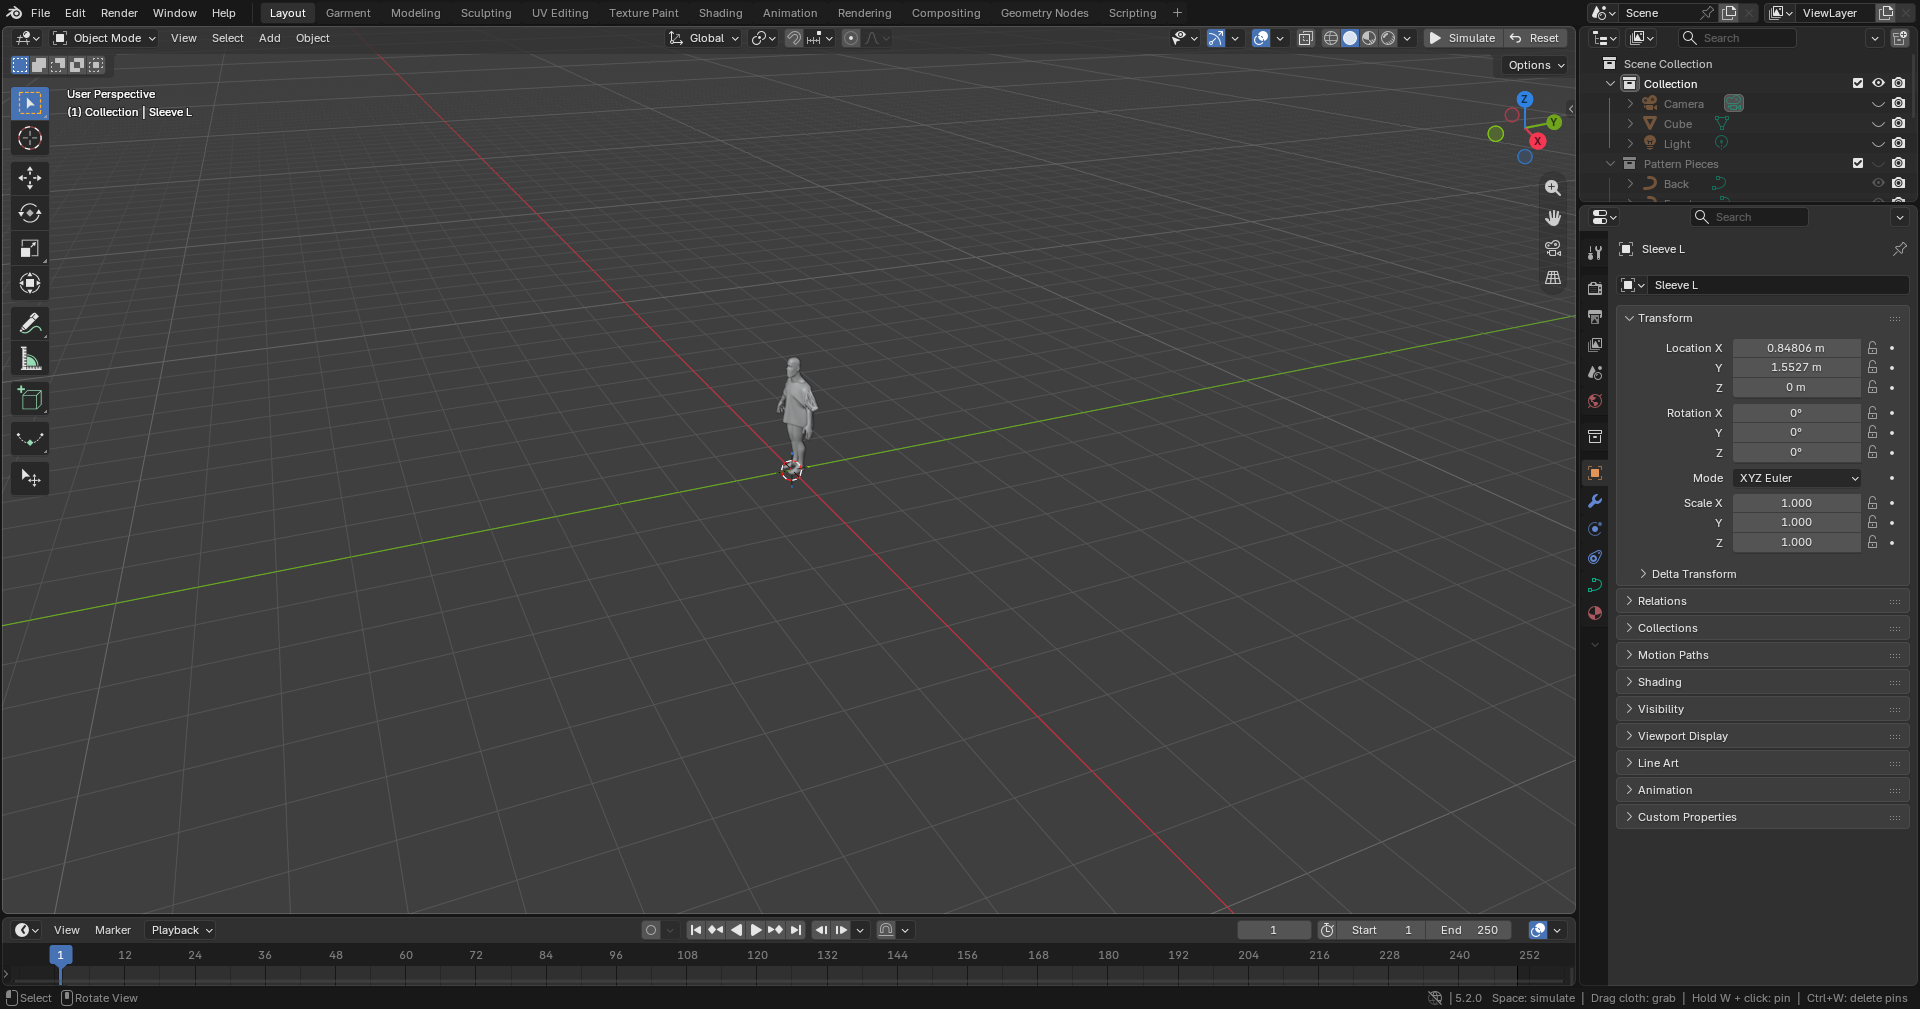
  1. In Blender's own Layout the flat pieces don't show: their collection, Pattern Pieces, has its eye closed in the outliner.
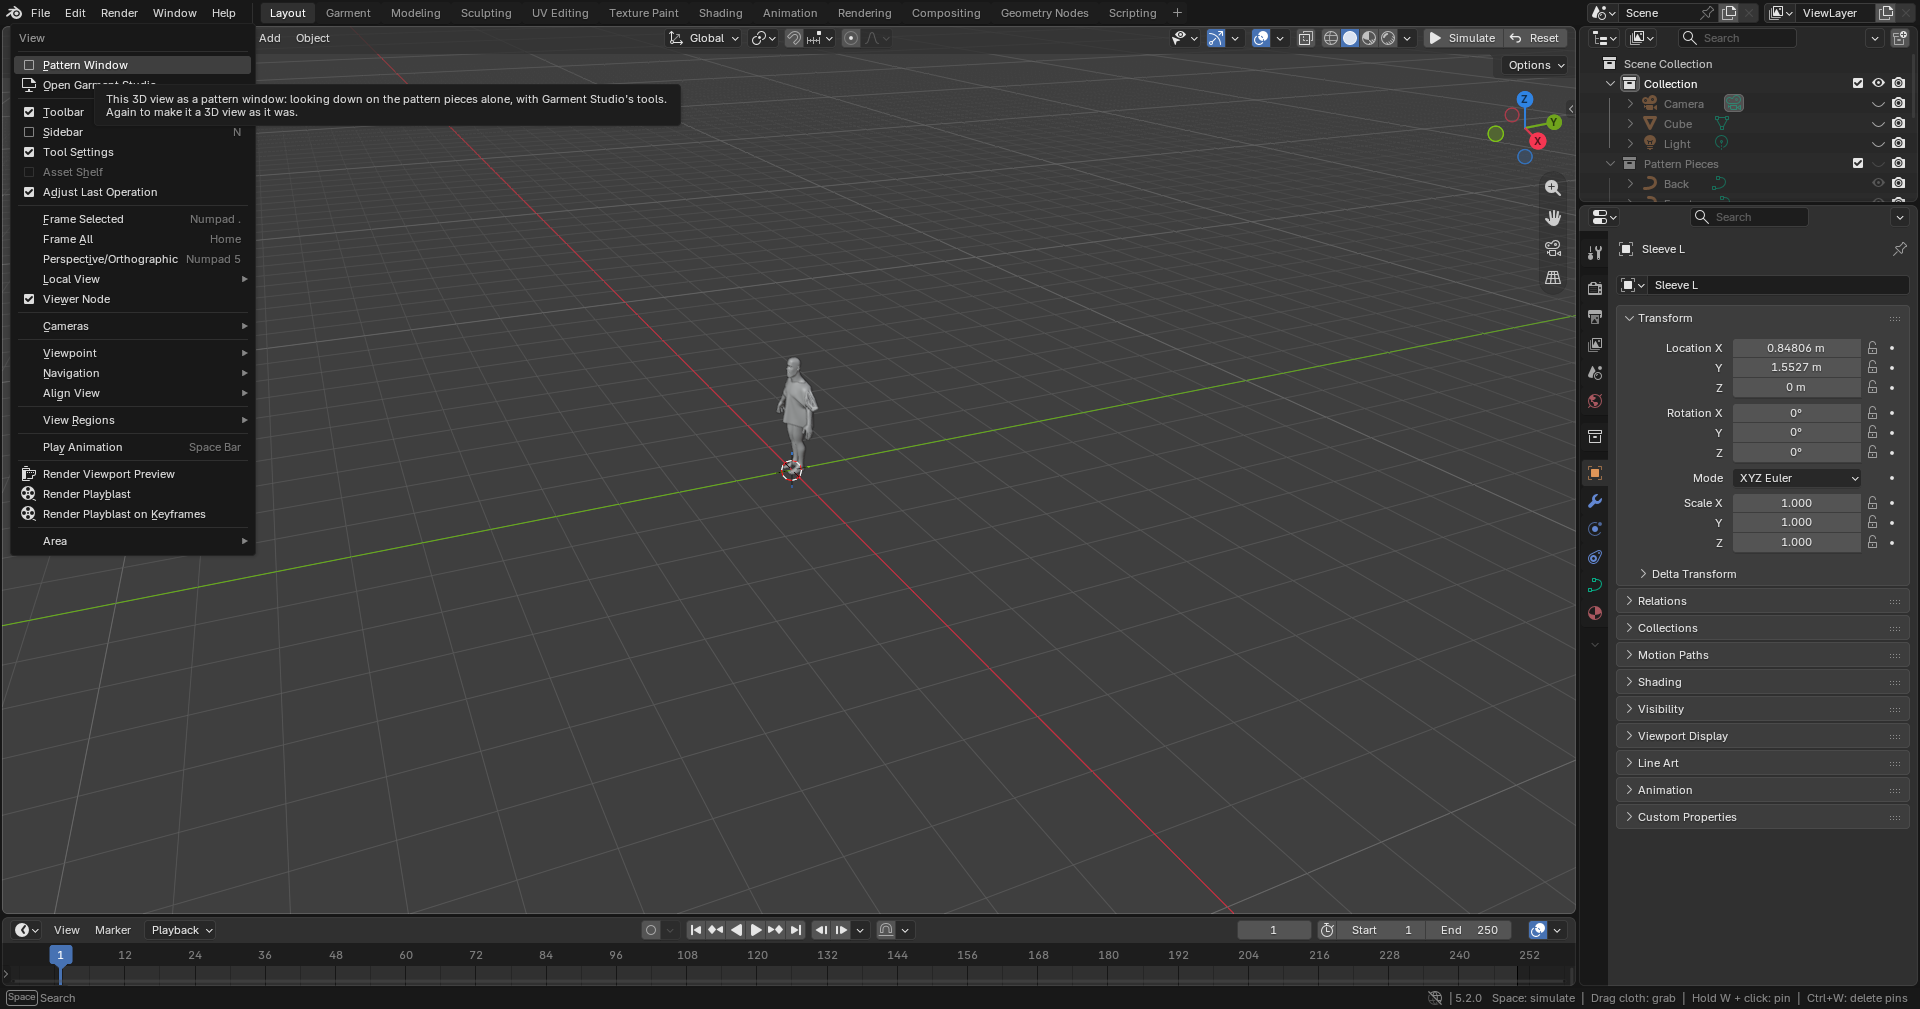
  2. View › Pattern Window: this 3D view looks down on the pattern pieces alone, with Garment Studio's Tools in it.
  3. View › Pattern Window again: the 3D view as it was.
Blender's Layout workspace: the outliner shows the Pattern Pieces collection with its eye closed, and the 3D view shows no flat pieces
Blender's Layout: the pieces' collection, Pattern Pieces, has its eye closed, so ordinary 3D views don't show the flat pieces.
The View menu of a 3D view with Pattern Window and Open Garment Studio at the top
View › Pattern Window, in any 3D view. In a window Garment Studio works in, the same menu has Garment Tools and the Task Bar.

Tutorials

Things to try, one clip each

Each clip loops. Follow the steps beside it on the T-shirt from Get started.

Pull the cloth while it simulates, recorded in Blender

Tutorial 1

Pull the cloth while it simulates

  1. With Select / Move in the 3D window's Tools, drag the cloth: it follows the mouse.
  2. Let go and it settles. Hold W and click to pin a spot; Ctrl+W takes every pin off.
Pick a piece, recorded in Blender

Tutorial 2

Pick a piece

  1. Click a piece in the pattern window. Picked in the sidebar shows its values, the task bar its buttons, the tool settings row its width, height and seam allowance.
  2. In 3D the gizmo moves it along, turns it round the body and bends it.
Draw and reshape a piece, recorded in Blender

Tutorial 3

Draw and reshape a piece

  1. Pick Rectangle in the Tools and drag on the pattern. To type a size: width, Tab, height, Enter.
  2. Tab for Edit Mode, then drag a corner: the 3D piece follows.
Sew two edges, recorded in Blender

Tutorial 4

Sew two edges

  1. Pick Sew Mode (the drop-down at the left of the pattern window's header, or Ctrl+Tab): Segment Sewing is in hand. Click one edge, then the edge it joins, near the ends that should meet.
  2. An uneven seam says by how much; pick it for Even Out in the tool settings row.
Place a piece on the body, recorded in Blender

Tutorial 5

Place a piece on the body

  1. The arrangement points show on the avatar (Cloth › Arrangement Points, its button in the 3D window's header, or the Arrangement Points tool under Place in the 3D window's Tools, which also moves them).
  2. Pick a piece, click a point: it wraps on there. While the cloth simulates, that piece starts again from there and the rest carries on.
Cut while it simulates, recorded in Blender

Tutorial 6

Cut while it simulates

  1. In Edit Mode (Tab), pick the Knife in the Tools and drag across a piece: it is cut in two and the cut sewn back.
  2. The piece cut off keeps its place: here the Back's hem strip stays at the hem, and starts on the cloth where it was.

Every operation

Operations, chapter by chapter

Each clip acts one operation out in Blender. The numbers drawn on it are the steps beside it, in order.

Object Mode: whole pieces

Mirror a piece, recorded in Blender

Pattern window, Object Mode

Mirror a piece

  1. Right-click the piece, in Object Mode.
  2. Point at Mirror.
  3. Click Flip X: the piece turns over where it lies, its seams kept.

Flip Y turns it upside down. Ctrl+M is Flip X without the menu.

Clone as Symmetric (with Sewing), recorded in Blender

Pattern window, Object Mode

Clone as Symmetric (with Sewing)

  1. Right-click a piece that has no twin yet: here the left sleeve, the right one deleted.
  2. Point at Mirror.
  3. Click Clone as Symmetric (with Sewing): a linked mirror copy lies across the centre line, on the other arm, sewn as the sleeve is.

A twin already there is made again in its place, and a cuff or band on the piece comes along. Sleeve from Armhole makes the other arm's sleeve this way.

Pick and move a piece, recorded in Blender

Pattern window, Object Mode, Select / Move

Pick and move a piece

  1. Click a piece: it is picked, outlined in orange, and its width, height and seam allowance show in the tool settings row.
  2. Drag it to move it on the board. Where it sits on the body in 3D does not change.

Shift+click picks more pieces; a drag on the empty board picks the pieces inside the box.

Copy and paste a piece, recorded in Blender

Pattern window, Object Mode

Copy and paste a piece

  1. Pick the piece and press Ctrl+C (or right-click, Copy).
  2. Press Ctrl+V: the copy lands beside it, with its fabric and settings, ready to move.

A pasted copy is not sewn: sew it where it belongs.

Duplicate a piece, recorded in Blender

Pattern window, Object Mode

Duplicate a piece

  1. Right-click the piece.
  2. Click Duplicate: a copy lies beside it, picked.

Shift+D duplicates and moves the copy with the mouse until you click.

Delete a piece, recorded in Blender

Pattern window, Object Mode

Delete a piece

  1. Right-click the piece.
  2. Click Delete: the piece and its seams are gone; Ctrl+Z brings them back.

X or Delete does the same to the picked pieces.

Rename a piece, recorded in Blender

Pattern window, Object Mode

Rename a piece

  1. Right-click the piece.
  2. Click Rename.
  3. Type the new name and press Enter.

F2 renames the picked piece without the menu.

Give a piece another fabric, recorded in Blender

Pattern window, Object Mode

Give a piece another fabric

  1. Right-click the piece.
  2. Point at Physical Fabric.
  3. Click a fabric: the piece takes it; while the cloth simulates it changes at once.

The Physical Fabric panel in the sidebar shows the fabric's numbers; New Fabric makes one of your own.

Finer triangles on one piece, recorded in Blender

Pattern window, Object Mode

Finer triangles on one piece

  1. Right-click the piece.
  2. Point at Triangle Size.
  3. Click a size: smaller triangles fold more finely and simulate more slowly.

Simulation Settings > Cloth Detail sets the size of every piece at once.

Flip a piece's normals, recorded in Blender

Pattern window, Object Mode; the cloth in the 3D window

Flip a piece's normals

  1. Right-click the piece.
  2. Click Flip Normals: its cloth in the 3D window turns its other side out for shading, at once.

Flip Wrap Direction, just under it, wraps the piece round the body the other way instead.

Smooth or flat shading, recorded in Blender

Pattern window, Object Mode; the cloth in the 3D window

Smooth or flat shading

  1. Right-click the piece.
  2. Click Shade Smooth: its cloth in 3D is drawn smooth; Shade Flat shows every triangle.
Freeze a piece, recorded in Blender

Pattern window, Object Mode; the cloth in the 3D window

Freeze a piece

  1. Right-click the piece while the cloth simulates.
  2. Click Freeze: it holds its shape where it is while the rest moves on (Ctrl+K).

Freeze again lets it go. A frozen piece still holds what is sewn to it.

Pause one piece, recorded in Blender

Pattern window, Object Mode; the cloth in the 3D window

Pause one piece

  1. Right-click the piece while the cloth simulates.
  2. Click Pause: that piece stops where it is and the others carry on; Let It Simulate starts it again.

Every piece in the Collections list has its own pause button too.

Pick pieces in the Collections list, recorded in Blender

Pattern window, the sidebar's Collections list

Pick pieces in the Collections list

  1. In the sidebar's Collections list, click a piece's name: it is picked, on the board and on the cloth.
  2. Ctrl+click another name: one more is picked (Ctrl+click it again: one less). Shift+click picks every row from the last one clicked, as in Blender's Outliner.
  3. Right-click a row: its menu, with Copy, Paste, Duplicate and Delete. With the mouse over the list, Ctrl+C, Ctrl+V, Ctrl+D and X do the same.

A piece picked on the board or the cloth lights its name in the list. A collection clicked is the active one: Material and Physical Fabric then change every piece in it.

Edit Mode: a piece's shape

Move a point, recorded in Blender

Pattern window, Edit Mode

Move a point

  1. With the mouse over the pattern, press Tab: Edit Mode, with Edit Point in hand.
  2. Click a corner of a piece: the point is picked.
  3. Drag it: its two edges follow, and so does the piece in the 3D window.

Shift+click picks more points; G moves, R turns and S scales them, as in Blender. Tab goes back to Object Mode.

Type an edge's length, recorded in Blender

Pattern window, Edit Mode, the Edges panel

Type an edge's length

  1. In Edit Mode, click the middle of an edge: the edge is picked.
  2. In the Edges panel (sidebar, N), click Length and type the new length, then Enter.
  3. The edge takes that length. Start, Middle or End above it says which part stays put.

Angle, under it, is the edge's slope: 0 level, 90 upright. A typed angle turns the edge about the same Start, Middle or End.

Curve an edge, recorded in Blender

Pattern window, Edit Mode

Curve an edge

  1. In Edit Mode, pick Edit Curvature in the Tools.
  2. Drag an edge's middle out or in: the edge bends into a curve, and the 3D piece follows.

Curve (%) in the Edges panel types how far the middle stands out. Edit Curve Point adds a curved point instead.

Add a point on an edge, recorded in Blender

Pattern window, Edit Mode

Add a point on an edge

  1. In Edit Mode, pick Add Point in the Tools.
  2. Click an edge where the new corner should be: the point is added there.
  3. Drag the new point to shape the outline (Edit Point in hand).

Delete or X removes picked points. Right-click a point for Point Type: smooth or sharp.

Sew Mode

Sew two edges, recorded in Blender

Pattern window, Sew Mode

Sew two edges

  1. Pick Sew Mode from the drop-down at the left of the pattern window's header (or Ctrl+Tab): Segment Sewing is in hand.
  2. Click one edge near the end that should meet the other piece.
  3. Click the second edge near its matching end: the seam is made, the same number on both edges.

An uneven seam says by how much. Free Sewing and M:N Sewing in the Tools sew parts of edges, or several edges at once.

The 3D window

Simulate, pause and reset, recorded in Blender

3D window

Simulate, pause and reset

  1. With the mouse over the 3D window, press Space: the pieces sew shut and drape.
  2. Space again pauses; the cloth stays as it is.
  3. Reset (in the Simulate panel) puts the cloth back where it started.

While it simulates you can keep working: pick, move and edit pieces on the pattern, and the cloth follows.

Sew on the cloth, recorded in Blender

3D window

Sew on the cloth

  1. In the 3D window's Tools, pick Segment Sewing (the Sew group): the edges you can sew are bolded on the cloth.
  2. Click an edge on the cloth near the end that should meet the other piece: it lights up.
  3. Click the other edge near its matching end (turn the view first if it is round the back): the seam is made, in both windows.

Free Sewing, M:N Sewing and Edit Sewing work on the cloth too, and snap to corners, seam ends, notches and edge middles within Snap Strength pixels. With X Mirror on, the other side is sewn too.

Pick several pieces on the cloth, and delete them, recorded in Blender

3D window

Pick several pieces on the cloth, and delete them

  1. Click a piece on the cloth, Select / Move in hand: it is picked, in both windows.
  2. Shift+click another: both are picked (Shift+click it again: taken away).
  3. Press Delete (or X): the picked pieces go, with their seams. Ctrl+Z brings them back.

With Edit Sewing in hand and seams picked, Delete takes the seams instead.

Tack the cloth to the avatar along a line, recorded in Blender

3D window

Tack the cloth to the avatar along a line

  1. In the 3D window's Tools, pick Tack to Avatar (the Hold group).
  2. Drag along the cloth: a line of tacks, Spacing apart (in the top bar). Hold Ctrl while dragging for a straight line; Esc takes the line back.
  3. Right-click one tack: Delete This Avatar Tack takes that one alone (Remove Avatar Tacks, below it, takes them all).

Pin to Avatar draws lines the same way. Tack, Pin and Pin to Avatar have Delete This on their right-click too.

Move a placement point one way only, recorded in Blender

3D window

Move a placement point one way only

  1. In the 3D window's Tools, pick Arrangement Points (the Place group): the points show on the avatar.
  2. Drag a point. While dragging, press X: it keeps its height and goes round the body; Z: up and down only; the same key again frees it.

Move Along (Free, Around, Up and Down) and Mirror Points are in the top bar too, with Place, Add and Delete. Ctrl+Z puts a point back.

Fabric, triangles and simulation

Limit Fabric Stiffness, for every fabric, recorded in Blender

Pattern window, the Physical Fabric panel

Limit Fabric Stiffness, for every fabric

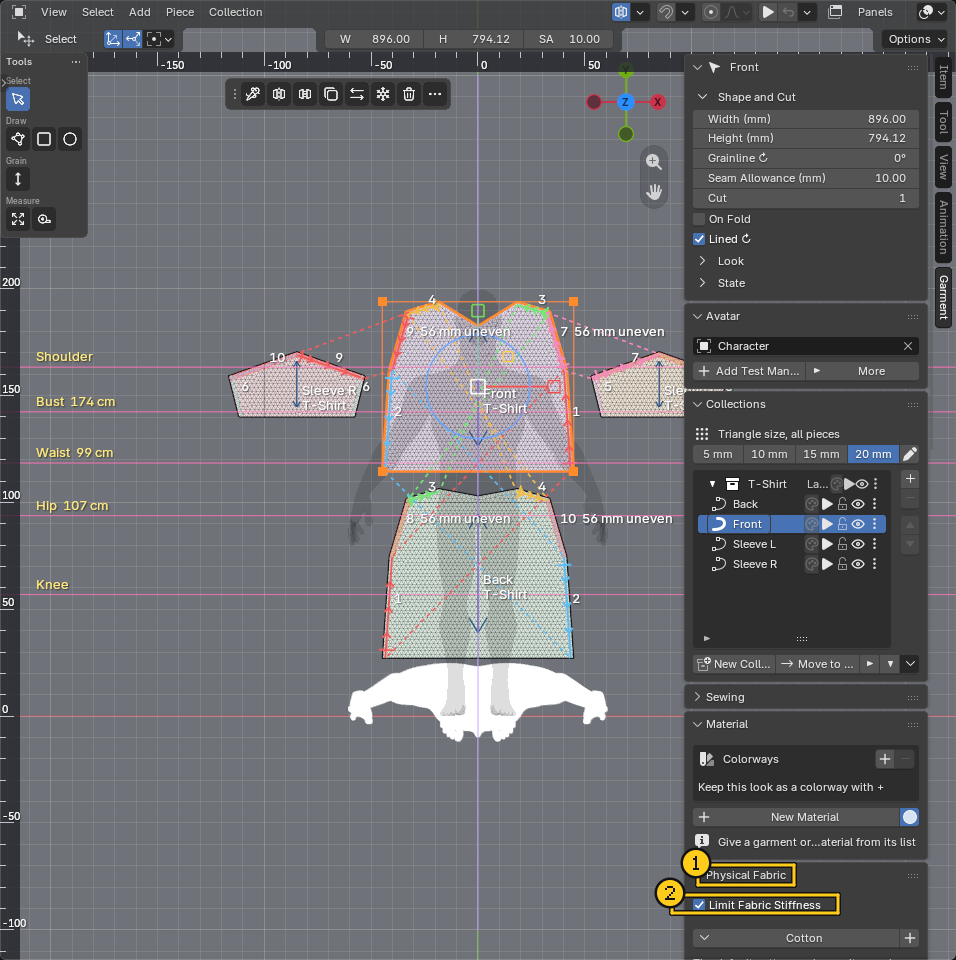
  1. Pick a piece and open the Physical Fabric panel (sidebar, N).
  2. Limit Fabric Stiffness is at its top: one setting for every fabric. On (the default), every fabric drapes smoothly with the usual solver passes; off, each keeps its own stiffness.

Off, stiff fabrics such as denim want Accurate Fabrics (Simulation Settings > Solver) for clean folds, and a collar wants Reinforce on its seam.

How it works

The ideas behind the tools

FrontBack sewn

Seams

Two edges are sewn edge to edge; the ticks show which way each runs, so the ends that meet are the ones you clicked near. A longer edge sewn to a shorter one is eased or gathered onto it.

front point: the Front wraps from here body

Arrangement

Each body part is a shape the pieces start wrapped round; the points sit on the skin. Pieces wrap round from the point, narrower where the body narrows, and stop at the side when a partner faces them.

body shirt (lower in the list) jacket (top of the list)

Collections

Each garment is a collection in the Collections list. The top of the list is the outermost cloth: a jacket's collection above a shirt's keeps the jacket outside. A piece's Level is a fine adjustment inside its collection.

MXL

Sizes

The base size is drawn; every other size is worked out from it. Across, each point moves by the girth difference where it sits (bust, waist or hip); lengths follow height from the top down.

_L_R avatar centre

Symmetry

With Symmetry on, the avatar's centre line divides the board. A piece drawn on one side gets a linked twin on the other; one drawn across becomes symmetric; seams are sewn on both sides.

Tools

Tools on the pattern and in 3D

What each tool does, as its status bar says while you use it.

Pattern window tools
Transform PatternClick: select | Drag: move | Gizmo: arrows move along, ring turns, end boxes stretch, type a number + Enter | Click a line: the gizmo turns or stretches it, its ends snap as it moves | Corners: scale | Ctrl-drag: box select | Ctrl+Shift-drag: lasso
Edit PatternClick a point or edge | Click inside a piece: pick it | Ctrl+click an edge: add a point | Alt+click an edge: its whole side | Double-click: whole outline | Drag: move, right-click to type a distance | Gizmo: move, turn or stretch the selection | Drag a handle: Alt frees it from its partner | Alt-drag a corner: round it | Shift: add / straighten | Delete: remove
Edit CurvatureDrag an edge to bend it into a curve
Edit Curve PointClick an edge to add a curved point, drag to shape it
Add PointClick an edge to add a corner point, drag to place it
Point TypeClick a point: sharp or smooth | Drag from a point: pull out even handles | Click a handle: take it in | V with points chosen: free their handles, V again puts them back
PolygonClick: corner | Ctrl-click: curve point | Drag: pull a curve | Type a length, Tab for angle, Enter to place | Click first point: close | Alt: no snapping
RectangleDrag: draw, and type width, Tab, height, Enter | Shift: square | Ctrl: from centre | Click: type a size
EllipseDrag: draw, and type width, Tab, height, Enter | Shift: circle | Ctrl: from centre | Click: type a size
Internal Polygon / LineClick: corner | Ctrl-click: curve point | Drag: pull a curve | Enter: finish a line | Click first point: close a shape | Alt: no snapping
Internal RectangleDrag inside a panel | Shift: square | Ctrl: from centre
Internal EllipseDrag inside a panel | Shift: circle | Ctrl: from centre
TraceClick an internal shape to make it a new panel | For a line, click on the side you want | Shift+click several, Enter makes them all | Where it goes: the top bar
DartDrag inside a panel for a dart, or click to type a size | Drag from an edge to cut a V into it
NotchClick an edge to add a notch (its kind in the toolbar) | Click a notch to remove it | Alt+click a notch: change its kind | Right-click an edge: exact position
MeasureDrag to leave a measurement on the board | Click one to remove it
GrainlineDrag inside a panel to set the fabric direction | Shift: 45 degree steps
KnifeDrag across panels to cut them | Ctrl: freehand | Shift: square angles | The cut is sewn back together
Pen CutClick: corner | Drag: curve | Enter: cut every piece it crosses | Hold Space: move the point being placed | Backspace: take a point back | Esc: stop
Lengthen or ShortenDrag a line across the pieces (Shift: level), or click a guide from the top ruler | Then drag the line down to lengthen, up to shorten (Ctrl: 5 mm steps) | Or type the amount in the top bar
Redraw EdgeClick a point of an outline, draw the new line, click a second point of the same outline | Enter: use as the edge | The old shape stays dashed: click its before to go back or clear it
Quilt LineClick: corner | Ctrl-click: curve point | Drag: pull a curve | Type a length, Tab for angle | Enter: finish | Puff is in the Draft menu
Round CornerDrag from a corner: how far you drag sets the radius | Esc: cancel
Offset LineDrag inward from an edge | Ctrl: the whole outline | Esc: cancel
Turn UpDrag inward from an edge: how far you drag sets the depth | Esc: cancel
Strip from EdgeDrag outward from an edge: how far you drag sets the width | Esc: cancel
PleatDrag along where the pleat should run | Width is in the Draft menu | Esc: cancel
FacingDrag inward from an edge: how wide | Hold Ctrl: follow the open edge around corners | Esc: cancel
HemDrag inward from an edge: how deep | Hold Ctrl: follow the open edge around corners | Esc: cancel
BindingDrag inward from an edge: how wide on each side | Hold Ctrl: follow the open edge around corners | Esc: cancel
TopstitchDrag inward from an edge: how far in | Hold Ctrl: the whole outline | Style is in the Draft menu | Esc: cancel
PocketDrag a box on a panel: a pocket that size | Click: the size in the Draft menu | Styles: Patch, Flap, Welt, Zip, Jeans, Kangaroo
Place TrimClick a panel: place | Drag, or Shift+click then click: a row (wheel: how many) | From Edge in the Trims menu | Overlapping panels: it goes on the selected one, or the one with no trim there | Click a trim of this sort: select, drag: move | Delete: remove | Right-click: menu
FastenClick a button, then its buttonhole, even on overlapping panels | Rows fasten together | Right-click a trim: undo | Esc: cancel
ZipperDrag the first side, then the second (edges or internal lines) | Over several pieces: drag on onto the next, or Shift+drag | Enter: zip as it is, or with one side the other found | Drag from where it starts closing
CordClick along the path, and on eyelets or cloth to fasten it there | Enter: finish | Backspace: undo a point | Esc: cancel
Dart TransferClick a V dart's tip, then the spot on the outline where it should open instead | Esc: cancel
Live Slash and SpreadDrag an internal line to open the panel along it | Grab near an end to fan it, the middle to open evenly | Shift: evenly
Walk EdgesClick near the start on two edges, then move along the first to walk the second against it | Click on the way: a notch on both edges | Enter or right-click: done | Esc: cancel
Tape MeasureClick whole edges or drag part of one, Enter to keep it in the measurement table | Delete: undo a pick
Trim and ExtendClick near the end of an edge to change, then click the line or guide it should stop on | Esc: cancel
Move Reference ImageDrag: move the image | Ctrl-drag along something of known length: set its real size
Segment SewingClick an edge or internal line, then a second to sew them | Click near matching ends | Ctrl+click: its whole opening (an armhole over front and back), notch to notch | Shift+click more edges: 1:N, let go of Shift to sew | Ctrl+B: turn the second round | Backspace: start again | Esc: cancel
Pick EdgesClick edges on any pieces to choose them, again to take one off | Ctrl-click: the whole opening | Click the board: clear | Then a band, facing, hem or binding from the toolbar or right-click
Edit TrimsClick a trim or a zip: select | Shift: add | Drag a box: many | Drag: slide | Drag a row's end: stretch it | A zip's round handle: open or close it, its squares: its ends | Delete: remove | Right-click: menu
Free SewingDrag along an edge for the first stretch, then the second (or click, move, click) | Type a number for its length, Enter | Blue dot: the first one's length | Shift: more stretches (1:N) | Ctrl+B: turn the second round | Backspace: take back | Esc: cancel
M:N SewingClick whole edges or drag part of one, Enter, then the second side, Enter | White dots: where each share will end | Ctrl+B: turn the side round | Backspace: take back an edge | Esc: cancel
Edit SewingClick a seam: pick it (a run: all of it; Alt+click one part) | Shift+click or a box: more seams | Drag its middle: slide it; an end: its length (where two seams meet, both; Alt: one) | Ctrl+B reverse | H hide, Alt+H show all | Delete remove | Ctrl+click an edge: into the picked run or out
CreateDraw, reshape and cut pieces
SewJoin edges
FinishHems, facings, bands, stitches
TrimsButtons, zips, cords
Object ModeWhole pieces: clicks, box, G, R and S work on them; group, mirror, grain, fabric
Edit ModeA piece's shape: clicks, box, G, R and S work on points, edges and lines (1, 2, 3); cuts, darts, finishing
Sew ModeEverything about seams
Trims ModeTucks, zippers, buttons: place, edit, remove
3D window tools
Select / MoveSelect / Move (Q): drag cloth or panels
PinPin: click cloth to pin it
TackTack: click two points on the cloth to hold them together
Tack to AvatarTack to Avatar: click cloth to hold it to the character, with a little give
Pin to AvatarPin to Avatar: click cloth to hold it firmly to the character
SewSew: click near one edge of the cloth, then another, to sew them together
SteamSteam: brush the cloth to shrink it a little there (Ctrl lets it out), or relax its wrinkles. [ and ] change the brush size
Draw on ClothDraw on Cloth: click points on one piece of the cloth, Enter makes them a line on that piece (to cut, fold, gather or topstitch)
Free Sewing
M:N Sewing
Edit Sewing
Arrangement Points

Reference

Every command (428)

Every button and menu entry: what it does, its key, and where to find it. Read straight from the add-on, so it matches this version.

Limits

What it can't do yet

Known today, in 1.9.1. Each is either being worked on or waiting for a decision.

One platform
Windows with an NVIDIA graphics card, Blender 5.2. The physics engine (Newton with NVIDIA Warp) runs on the card; other systems can draw patterns but not simulate.
Layered outfits
Garments are kept apart (a jacket over a shirt settles cleanly in the test outfits), but gathered cuffs, hood corners and a trouser fly's facing can leave a few points crossing, and cloth pulled very hard can pass through itself for a moment before it heals.
A still avatar
The avatar is read when the simulation starts. Draping over a posed avatar works; cloth following an animation is not supported yet.
Final quality costs
Final with small triangles needs a lot of graphics memory and runs slower. Work in Draft and switch for the last drape.
Very thick cloth
A thick, bevelled finished mesh can show spikes at elbows and knees.
Oversized pieces
A piece scaled up far too much for its triangle size is drawn red and left out of the cloth; the Simulate panel says which and why.
One tool per workspace
Blender keeps one tool in hand for all the 3D views of a workspace. In a layout of your own, picking one of Blender's tools takes Garment Studio's out of hand in the pattern window too; click any Garment tool to take it back.
Undo while simulating
Undo takes the pattern back, and a piece's place in 3D with its cloth; the cloth itself carries on from where it is rather than jumping back in time.
Stiff fabrics at their own stiffness
Limit Fabric Stiffness is on by default, so every fabric drapes smoothly with the usual solver passes. Switched off (Physical Fabric panel, or Simulation Settings › Advanced), stiff fabrics such as denim or leather want Accurate Fabrics (Simulation Settings › Solver) for clean folds, and a collar wants Reinforce on its seam to stand.
Panel order in older files
Blender remembers each sidebar's panel order, so in a file from an older version a new panel can appear further down. Drag its header to move it.
Reports welcome
If the cloth ever vanishes after an undo, or something else goes wrong, open the Flight Record straight away (Simulate panel, or Help › Garment Studio: Flight Record): it lists every command since the file opened.

Is it a beta?

Yes: a beta for Blender 5.2 on Windows with NVIDIA

The whole loop works and is checked on every build. What keeps it from a 1.0 is feedback from people who didn't build it, and the gaps listed under Limits.

Ready

  • Draw, sew, place, simulate, cut, fit and finish a garment from the panels, menus and right-click, without Blender's Edit Mode.
  • Everything saves in the .blend: pieces, seams, fabrics, layers.
  • 2,132 automatic tests of the geometry and maths, and 182 scripted checks that drive Blender itself, run on every build.
  • Stress tests make dozens of edits with undo and redo after each one; a speed check holds 60 frames a second with the panels open.
  • Behaves like a Blender add-on: its own workspace, or a pattern window in any of yours.

Not yet

  • The interface has had one main tester so far: feedback from new users is what this beta is for.
  • Layered outfits still have the known gaps above.
  • One platform, and English only.
  • No feedback channel built in beyond the Flight Record.